ArcadeCab
How to install Mamewah v.1.62b13
Introduction
This page is for person's looking for simple help to get the newest release of Mamewah (as of July 11, 2007) up and running. Version 1.62 significantly changed the structure of Mamewah's folders from the previous releases. I have shown how to set it up using my personal configuration as an example. For instructions on how to install older versions, feel free to refer to my older Mamewah installation guide.
Install Mamewah
1) Download the system files zip and the Mamewah installation down from Mamewah's site; You can also download the zip file from a copy on my site. What I have further done is to create a zip file of all the changes I describe in this document. In other words, it is my setup if you want to just start wit hit rather than the download from Mamewah's site. If you do, download My Mamewah 1.62b13 setup.
2) Follow the directions and install the system files (if needed);
3) Do the same with the Mamewah download. To make things easy to understand, I named the folder MAMEWAH_1.62B13. Now we will examine the folders Mamewah has installed and begin changing them.
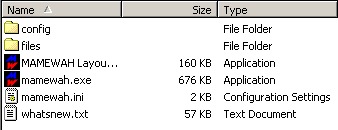
The default directory structure of C:\MAMEWAH_1.62B13.

You can see how my default Mamewah folder structure is set up to the left. If you've worked with previous releases of Mamewah, you'll notice the number of folders has been greatly reduced.
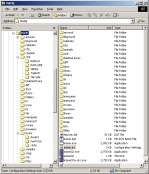
 Before explaining the changes, I'll remind you of my MAME
setup. As a reference, my MAME installation folder layout is
included to the right. (Click it for a larger image) You
want to ensure you have a copy of the Windows Command-line Mame executable in this
directory (C:\MAME\). This can be downloaded from
Mame.Net
(top of the list). Mamewah requires the DOS
version of MAME in order to work. You can now copy my
mame.ini file to C:\MAME\. Once you
download this file, you must change the file name to mame.ini as it is
not named that way at present. That is all you need to set
up for the Mame folder. (Update- You might not need Mame.ini in order
for your setup to work. It has specific settings that I use that you
might benefit from.)
Before explaining the changes, I'll remind you of my MAME
setup. As a reference, my MAME installation folder layout is
included to the right. (Click it for a larger image) You
want to ensure you have a copy of the Windows Command-line Mame executable in this
directory (C:\MAME\). This can be downloaded from
Mame.Net
(top of the list). Mamewah requires the DOS
version of MAME in order to work. You can now copy my
mame.ini file to C:\MAME\. Once you
download this file, you must change the file name to mame.ini as it is
not named that way at present. That is all you need to set
up for the Mame folder. (Update- You might not need Mame.ini in order
for your setup to work. It has specific settings that I use that you
might benefit from.)Specific file changes
The following describes some of the major changes I made to get my installation to work. The files being described already have the changes made and can just be downloaded and used immediately. I'll again mention the Mamewah 1.62b13 setup zip file you can download.
In MAMEWAH_1.62B13/Mamewah.ini, I changed safe_mode to 0 which makes the layouts fullscreen, and show_cursor to 0 as there is no need to see the pointer when scrolling through the game lists. In MAMEWAH_1.62B13/config/mame/mame.ini I changed list_generation_method to rom_folder_vs_listinfo as I use mame v. 92, and artwork_image_paths to c:\mame\snap;c:\mame\marquees. That is another change in this release: there is only a single artwork path entry, and you need to just string all your artworks, in order, separated by semi-colons. In MAMEWAH_1.62B13/config/mamewah.cfg I needed to add key values to NEXT_EMULATOR and PREVIOUS_EMULATOR. More on this further on. That was really the big files to modify.
Layouts
Next off, we'll tackle Mamewah's layout(s). I used the same old Mamewah layout I've had since the end of 2005. You'll certainly wish to use your own layout, but this should give you an idea where to place your own files. Some of the most popular questions to me have been ones related to layout files. Starting with version 1.62 the emulator layouts need to be in their own folders, beneath config/. As you can see below, I have added mame, Atari2600 and mame99 folders. This new format initially confused me until it finally clicked, then it made a lot of sense. It'll be far easier to debug as you add emulators with all the files associated with each one in the same folder.

When you look in the config folder, you see the three emulator folders as well as the all-important mamewah.cfg file. By default Mamewah does not enable moving easily from one emulator to another. I added the capability using the NEXT_EMULATOR and PREVIOUS_EMULATOR variables that have been added in the new release. I will tell you it took me a good half-hour to figure out why it wasn't working. I hope this saves you the same headache.

All the emulator folders are setup pretty much exactly the same. As most of you are most interested with the MAME folder, I'll detail that. Within each you include the Mamewah layout you wish to use (layout.lay), along with the images associated with it. My example below shows me using main.jpg (the background image), logo.jpg (my marquee), and Options.jpg (background used when you click the admin screen in Mamewah). You also need a mame.ini (or [emulator].ini). The mame.lst file will be created by Mamewah to show all the games you have for that emulator. The game folder is created by Mamewah and you need not worry about creating it yourself. If you create a new layout using the MAMEWAH Layout application, just save all the parts to the correct emulator folder. Very simple. You'll also want to add all your artwork paths to artwork_image_paths in your [emulator].ini file.

Adding Additional Emulators
You'll note that the Atari2600 folder is very similar to the mame folder. I have included a message.jpg (for error messages in Mamewah). My Atari setup is the Z26 setup I detail elsewhere on the site.

When you add any other emulators, you follow the same procedure: Create the emulator's folder name below /config. What I found the easiest to do then is copy the files from the mame folder, and then just change mame.ini to the emulator_name.ini (ie: Atari2600.ini). You'll then need to make specific changes to the .ini file to point to where your roms, etc are located. The best resource for the many, many emulators out there is the CPViewer site. He has the Mamewah 1.62 layouts as well as the .ini files for each emulator. You would just need to come up with the roms and snaps, etc, to get each emulator fully operational.
Test Setup
You should now be ready to test your installation. If you followed this setup, everything should work correctly now. You will be taken to your Mame game screen first. It will more than likely be empty. Just go into the Mamewah menu (Player 2 start button), click on Games List Options, then Generate List. This will create your list and you should now see all the games listed. You'll need to do this for each of the emulators you set up.
All Done
Everything should now to set up and ready to go. You can read the Mamewah docs for the description of what button does what, but the basics are:
|
Player 1 Start- Starts the game that is highlighted. Player 2 Start- Enters Mamewah's menu system. Player 1 Coin- Cycles through the current emulator's various subsets (All Games, Favorites, and Most Played) Player 2 Coin- Cycles through your available emulator list (Mame, Atari 2600, PC Games) |
I hope this set up has helped you. Mamewah is really quite easy to set up but you can be tricked up with some of the small details. I was able to get everything setup in less than an hour. There were significant changes to the folders since version 1.61 but it appears more sensible to me than before. It is certainly less confusing when adding a new emulator.
My files
 |
|
Mamewah Home.
ScreenshotArchive - Help pages, MAMEWAH Layouts, and screenshots.
CPViewer- Home to tons of Mamewah layouts and .ini files.

