ArcadeCab
Cabinet Plans 2: Background
Table of contents
- Background
- Tools
- Materials
- Cutting Side One
- Cutting Side Two
- Dado for the Base
- Building the Base
- Monitor Shelf
- Ledger Boards
- Speaker Area- Start
- Upper rear
- Back
- Top
- Drawer
- Door
- Speaker Area- Cuts
- Painting
- Assembly
- Marquee
- Monitor Bezel
- List of Boards
- Control Panel Part 1
- Control Panel Part 2
- Wiring the CP
- Attaching the CP
- Finishing Touches
- Software
- Final Thoughts

Background
Welcome to my second set of FREE cabinet plans. Since I put
the original help document on this site in 2003, a much larger number
of people have benefited than I would have ever dreamed.
Barely a week goes by without at least one email thanking me for the
resource. I am grateful for those who take the time to email
me and even happier when the visitors complete a cabinet they never
knew they could build for themselves. Please
continue to send me any progress and/or completed pictures of your
cabinet- I'd love to post them on my site.
There are areas in the first set of plans that are vague or missing completely that I hope to rectify in this new set. Expect to also see detailed explanation of the control panel build, how to wire up the coin door, and how to add one-click on/off switches. Between the two set of plans you should be able to have most any question you might have answered.
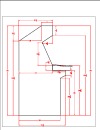
The page layout differs from the first. The table of contents is on the right of each page now, with the website controls on the left, consistent with the rest of the site. The cabinet dimension PDF is also included on each page, for easy access. Photos will be interspersed within the text, and the photos can be clicked to full-screen size. I have opted to increase the size of each large image to show greater detail. There are more photos than in the first cabinet plans. The text on each page will be more verbose (read: more detail) so please bear with me if I ramble in spots. My writing skills, you will see, have not improved since the first document.
The MAME cabinet shown is for my brother-in-law. He has wanted his own arcade cabinet since the very first visit to my home and we finally have gotten together to make it happen. He is an accomplished comic book artist and the finished product will show off his skills.
I had several design goals that differed from my first cabinet:
1) No external screw holes,
2) Lighter-weight, but equally sturdy, internal framing, and
3) Constructed specifically for a custom controller.
Now that we have the background out of the way, feel free to move on through the rest of the document. The pages will be added to gradually, as work is completed on the actual cabinet. Pages will continue to be refined/edited during this process but I felt it would be better to get some of the pages up than to wait for the finished cabinet. If you see any errors, please email me so they can be corrected. If any section seems confusing, let me know so it can be made clearer.
The next page shows the basic
tools you'll need to get the job done.