ArcadeCab
Cabinet Plans 2: Back Board
Cabinet Plans 2:
Table of contents
Table of contents
- Background
- Tools
- Materials
- Cutting Side One
- Cutting Side Two
- Dado for the Base
- Building the Base
- Monitor Shelf
- Ledger Boards
- Speaker Area- Start
- Upper rear
- Back
- Top
- Drawer
- Door
- Speaker Area- Cuts
- Painting
- Assembly
- Marquee
- Monitor Bezel
- List of Boards
- Control Panel Part 1
- Control Panel Part 2
- Wiring the CP
- Attaching the CP
- Finishing Touches
- Software
- Final Thoughts

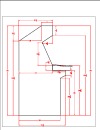
The Back Board
Compared to the previous
board, this one is a breeze. The only decision that you'll have to
make is how much of your cabinet back so you want enclosed. We
chose to leave enough open in the back to be able to slide Scott's PC
out. This amount of opening also allows plenty of air circulation
to keep the PC from overheating. We cut a board 20" wide x 31"
long. Adjust the 31" measurement to your preferences.
We then clamped it into place (B), and drove four screws into it (C). The result is shown in picture D. See, it was simple!
|
|
|
|
|


Next up is the top of the cabinet.