ArcadeCab
Cabinet Plans 2: Painting the Cabinet
Table of contents
- Background
- Tools
- Materials
- Cutting Side One
- Cutting Side Two
- Dado for the Base
- Building the Base
- Monitor Shelf
- Ledger Boards
- Speaker Area- Start
- Upper rear
- Back
- Top
- Drawer
- Door
- Speaker Area- Cuts
- Painting
- Assembly
- Marquee
- Monitor Bezel
- List of Boards
- Control Panel Part 1
- Control Panel Part 2
- Wiring the CP
- Attaching the CP
- Finishing Touches
- Software
- Final Thoughts

Painting- Step 1: Sanding
The first step in the painting
process is to thoroughly sand the entire cabinet. Although the
cabinet-grade plywood is fairly smooth already, it will benefit from
some overall fine sanding. In addition, the edges of the wood will
have chips and other "jaggies" from the cutting process.
Scott selected 240 grit and 400 (super-fine) grit sandpaper for the project. Using a sanding square (shown in A), he gave the all the pieces a good sanding with the 240 grit. The exterior sides received a buffing with the 400 to get them super smooth. Try to go with the grain whenever possible. Note- You could save yourself some time and use a random-orbital sander or a belt sander. If you use a belt-sander, be sure to go with the grain.
|
|
|
|


Painting-
Step 2: Priming
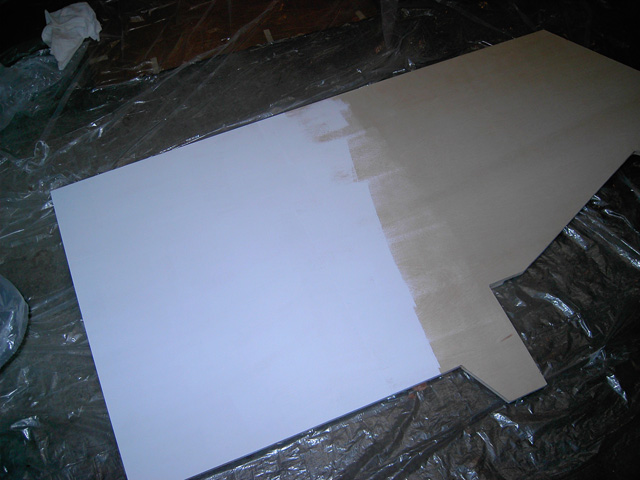
Next up is to prime all the pieces. Scott purchased a quart of
Kilz and it was just enough to prime both sides of all the pieces.
Also purchased were a variety of other items to make his life easier
(see D). You may or may not need them. Thoroughly wipe off all the boards with cotton cloths (old tee-shirts or
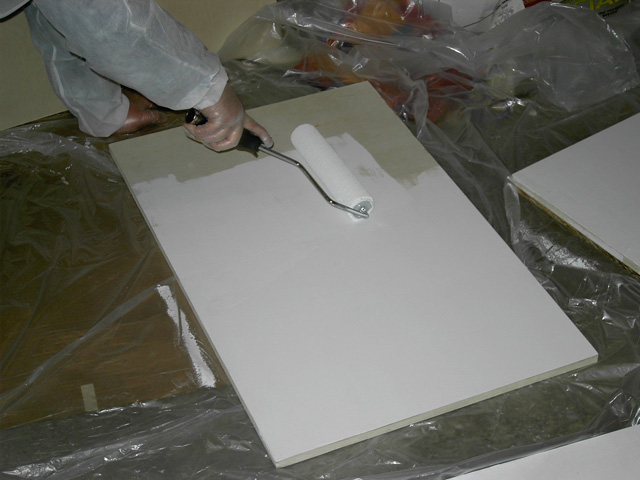
socks work great) before beginning. A roller makes quick work of
the job (see picture E). Scott primed all the interior sides
first, let them dry, flipped the boards and primed the exterior sides.
The Kilz dries fast so this process can be completed in about two hours.
|
|
|
|
|


Painting-
Step 3: Painting
Give the primer a good six hours to dry before
beginning to paint the interior sides of the boards. The
key word in the previous sentence is interior (as Scott
unfortunately found out the hard way). You'll want to set the good
side down. I found that if you can round up enough saw horses,
slap two-by-fours across them, it'll make painting the sides easier.
If that isn't possible, I'd recommend resting each board atop a couple
small scraps of wood, which is then atop plastic sheeting to keep your
floor clean. The small scraps elevate the boards so you can see if
there are any paint drips, which you can quickly wipe up.
Once you've set everything up, shake the paint well (before opening it, obviously). Then open the can and stir for a minute or two with one of the stir sticks you snagged from the store. You did grab a hand-full of them, right?
For the smaller boards, I used a 3" roller and a small foam brush. The foam brush is used to cut in around any ledger boards, and to paint the edges with a light coat of paint. Then use the foam roller to apply a thin, even coat to the boards, going with the grain. Make a final pass on each board to smooth out any bubbles.
For the interior of the sides, you can use a 9" roller where possible to make it go faster. Use a foam brush to cut in around the ledgers.
Let the first coat set until completely dry. This can vary greatly depending upon temperature and humidity. Once the coat has dried, apply a second coat just like the first. If two coats isn't enough, feel free to repeat with a third, but remember that you are painting the interior sides right now. I only painted a third coat on the inside of the door, and along the outside couple inches of the sides.
Let the boards dry at least overnight before beginning to paint the exterior sides.
Flip the boards so the good side is up (primed). We painted all the exterior sides except for the two side panels. We wanted to wait to paint the sides until we had assembled the cabinet. We didn't want to mar the paint when we used clamps to hold the cabinet together when attaching everything.
All exterior/top sides receive at least three coats. We did a fourth on the coin door. The exterior sides (which will be painted in the next step) will receive four as well. The best plan would be to let the pieces dry at least twelve hours after the final coat before assembly.